How To Use AWS EFS for a Load Balanced Environment
The RESTful Engine uses local storage to store the cache and requests. This is fine for a single instance, but if you want to use a load balanced system you need to setup some form of shared storage that all instances can access, so that the app can behave in a stateless manner.
This article outlines the steps you need to take to setup your AWS load balanced system with AWS EFS. This will allow you to use a load balanced system without the need to implement your own external storage plugin.
Steps
Note: all these steps are summarized from the AWS documentation here
Step 1: Create your Amazon EFS file system
Sign in to the AWS Management Console and open the Amazon EFS console at https://console.aws.amazon.com/efs/.
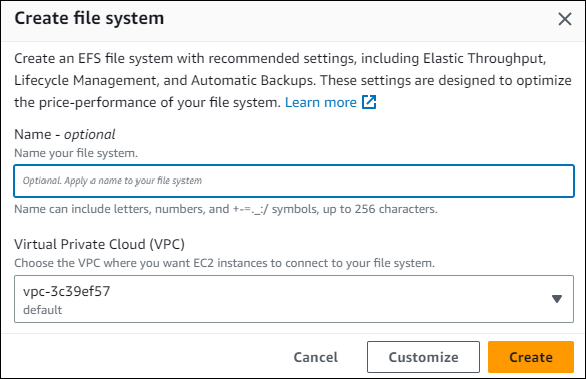
Choose
Create file Systemto open the Create File System dialog box. Enter a name for your File System and click Create:
Step 2: Create your EC2 resources and launch your EC2 instance
For this step, you can just follow the instructions here
Once you've created your EC2 instances, follow the instructions here to setup the Java RESTful Engine.
Finally, follow the steps here to install the Amazon EFS client on your VMs.
Step 3: Create a Load Balancer
Next, we need to setup a Load Balancer with the VMs that we want. This will allow your application to make use of the EFS. To do this, follow the instructions here
Step 3: Mounting on Amazon EC2 Linux instances using the EFS mount helper
In this step, we will mount the EFS we created to the App_Data directory in our Java RESTful install.
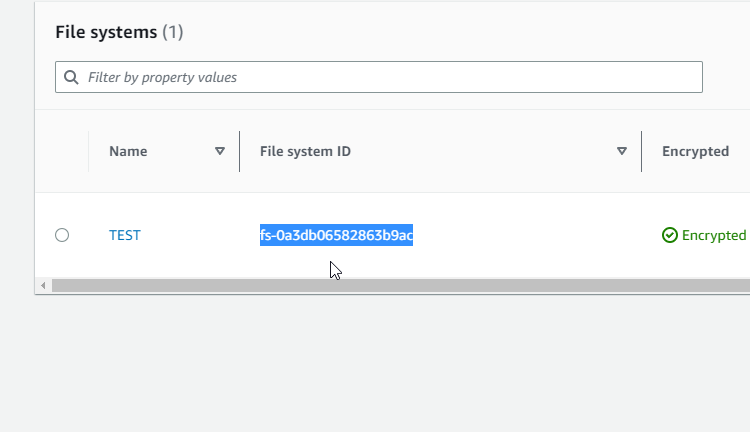
Acquire the "File system ID" for the EFS instance we created
- To do this, navigate to the EFS Console and find the EFS we created. There you will find the File system ID:
Next, in the terminal of your VM, navigate to the
webappsfolder for our Java RESTful Install (it should be in the/tomcatdirectory)Make sure youre in the
webappsdirectory, then run the following command:
sudo mount -t efs {EFS-ID} App_Data/
Where {EFS-ID} is the ID we acquiured earlier
Make sure you do step 3 in all VMs in your Load Balancer.
And that's it! Your Load Balancer is now using a shared file system, and all the nodes in your Load Balancer will have access to the same App_Data folder.